Why do “real” instruments like guitars and pianos sound so good compared to their digital counterparts?
The first reason is that real instruments don’t stay perfectly in tune all the time. (This is actually a good thing, we explain why in a second.)
Things like temperature, humidity, and wear cause slight variations in tuning that our ears interpret as being more interesting.
The second reason is that people have to actually play those instruments.
And this causes tiny variations in timing, rhythm, and pressure across different notes. (Again, this is good!)
And when these slight variations in tuning and rhythm add up, they result in a unique sound that’s pleasing to our ears.
Seriously, our brains actually register and enjoy these tiny imperfections! (This is why analog gear can be so sought after.)
Digital synths, however, stay perfectly in tune and play exactly the notes you’ve told them to.
“But that’s a good thing, right?”
Well, not always!
As a result of this perfection, digital synths like Vital and Serum can sound sterile and boring.
And boring is bad when you’re in the entertainment industry.
This is because each note sounds the exact same and lacks the subtle, real-world variations that give real instruments their character.
Luckily, there are a few tricks you can use to add character to your sounds.
Let’s get into it!
Table of Contents
Meet Your New Best Friends: Vital's Random LFOs
Random LFOs are a fantastic way to break up the sterile precision and add a little organic flair to any patch.
And the good news for you, the savvy Vital user, is that Vital has four random LFOs tucked under standard LFOs!
The image below shows you what Vital’s random LFOs look like, in case you’re having trouble finding them. (Many producers don’t notice them right away.)
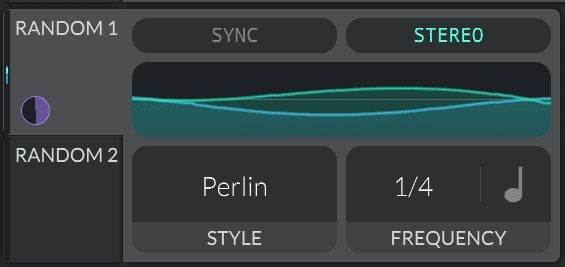
“Wait, I thought there were FOUR random LFOs, I only see TWO!”
As with the other LFOs inside of Vital, when you modulate the second random LFO you’ll see three and four appear.
Now that you’ve located the random LFOs and understand how to access all four, it’s time to start using them.
How To Add Character To Your Presets With Vital's Random LFOs
One of our favorite tricks is to assign the random LFOs to oscillator fine pitch with a very small modulation depth.
By doing this, you can breathe new life into simpler patches, especially pads or synth leads.
As the pitch drifts around, sustained tones will sound more varied and more natural. Even a little movement goes a long way here!
These subtle variations do a nice job emulating a human player who isn’t able to stay perfectly even. (Which, as we discussed above, is a good thing!)
Bonus Tip: Flute-like patches especially benefit from this kind of treatment.
Keep in mind: As you play the guitar, for example, you can’t really hear the pitch changing if you play the same note multiple times in a row. So be sure to use the random LFOs very subtly when modulating pitch to emulate a real player or instrument.

Make Captivating Melodic Dubstep
Get access to everything inside Odyssey and begin creating powerful and immersive music that your listeners will love.
Another cool trick is to assign the random LFOs to modulate envelope depth or other envelope parameters like attack or decay time.
Slight variations in the shape or depth of an envelope can help make your patches sound like they’re a real instrument played by a real person. And, as we’ve covered, people don’t articulate each note in the exact same way.
Which is good! This gives your otherwise sterile leads a more natural and organic sound.
“But wait, how do you modulate the depth of an envelope in Vital? There’s no knob for it anywhere!”
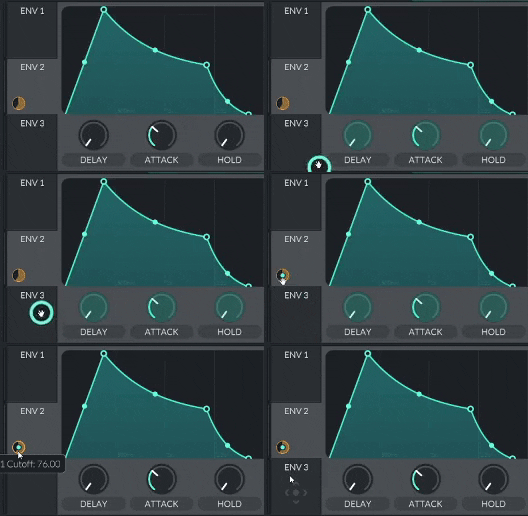
Here's how you modulate the depth of envelopes in Vital:
-
Drag the random LFO onto the modulation circle of an already assigned envelope, LFO, or macro.
-
You’ll see the modulation circle now has a small dot in it. This means that the depth of that modulation is being modulated by something else.
-
Now, the LFO controls the amount or “depth” of that envelope modulation. As the LFO increases, the envelope will have more of an effect on its destination, and as it decreases, the envelope will have less of an effect.
Create Glitchy Effects With Note-On Random
Vital has another unique source of randomization you can use to make some crazy sounds.
The modulation pad labeled “RANDOM” in the bottom right of Vital’s UI is a “note-on Random”. This means that each time a new note is played, a single, unique random value is generated.
When you use this pad as a modulation source, whatever parameter you modulate is offset by that random amount.
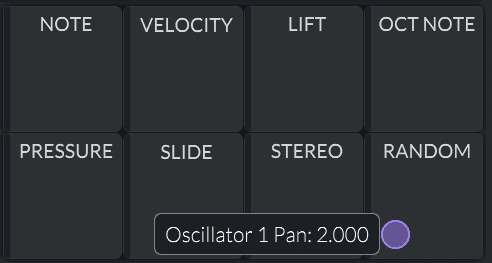
A couple of ways fun ways to use this note-on random feature are to:
- Assign it to the delay module’s delay time. This is a great way to get glitchy-sounding psychedelic effects since each note you play will have a different delay time.
- Assign it to an oscillator’s pan control. This is a cool way to get some surround-sound arpeggio patches where each note is panned differently!
Unfortunately, since there’s only one value generated each time you play a note…
Assigning the note-on random to all three oscillator’s pan knobs will cause them to get panned in the same direction.
And that’s not nearly as cool as each oscillator receiving its own unique panning!
Fortunately, there’s a way to make that happen.
We can use Vital’s “modulation remap” feature to create more random values based on the initial value.
We know that it all sounds complicated…
But that’s why we’re going to walk you through it step by step.
What Do Producers Think About
Our Melodic Dubstep Pack Odyssey?


Here’s how you can generate more random values when using the note-on random feature:
- Make sure you have the “Matrix” tab of Vital open.
- Select the row for one of your random modulations in the list by clicking on it. Having trouble selecting the correct row without editing something? There’s some free space to aim for between the morph control and the amount slider!
- Enable the paint tool by clicking on the paintbrush icon located at the top left of the mod remap window.
- Select “up” in the shape selector to the right of the paint icon.
- Paint a series of sawtooth (or saw) shapes into the window, as shown below.
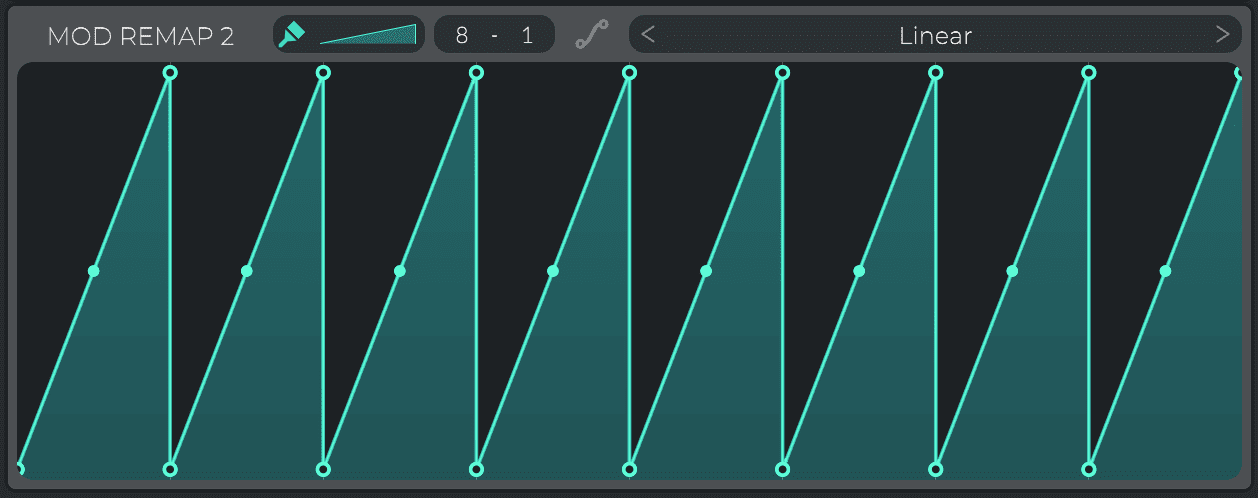
This transforms the original random value into another related but different random value.
So, if the original value was a low value, it will land on one of the earlier ramps. If it was a high value, it will land on one of the later ramps!
In either case, the new value will be higher, lower, or the same as the original. It just depends on exactly where it lands on the ramp.
And, the more saws you draw, the more unrelated to the original value the new random value becomes.
Drawing a different number of saws for each oscillator causes each of them to get panned differently.
Here’s how to set this up:
- For the first oscillator, use the original random value by leaving the remap curve as it is by default. (The default is a straight line.)
- Set up the second modulation entry with 8 sawtooth shapes
- Set the third modulation entry to have 16 saws on its remap curve. Setting the grid size to 16 makes this easier to draw in. Just drag on the numbers to the right of the paint tool’s shape selector until it shows “16”.
Once you’ve set this up, you get that randomized “surround sound” feeling where each note sounds different from the previous one!
Putting It All Together
Whether you’re trying to emulate the natural feel of a real-world instrument or create a surround sound arpeggio from outer space…
Vital’s randomization features are a powerful way to add subtle or not-so-subtle interest to your sounds.
By experimenting with these features, you can turn even the most boring sound into an attention grabber!
In fact, we used these techniques inside of Odyssey to give certain patches an organic feel often heard in melodic dubstep.
We found the random LFOs to be especially helpful when creating the evolving, angelic pads included in the pack.
So the next time you’re creating sounds in Vital, try using some random.
It’s an often-overlooked technique that can make a huge difference in your sound design!
Get 800+ Hard-Hitting Dubstep Presets, Samples, & Wavetables.
Our best deal ever. Take your music to the next level with 5 complete premium packs for every style of dubstep.

Unlocking the Power of Presets: What We Learned from Protohype’s Knights Demo
Veteran mastering engineer Aaron Roman shares 5 tips on mastering electronic music (EDM) for Spotify.
How to Make Custom FM Wavetables with Serum FM Wavetable Studio
Wavetables are an essential tool when sound designing and creating your own sounds. It is the brains and the fundamental

How To Submit Music To Record Labels | Tips, Tricks, & What To Avoid
Learn how to submit music to record labels with these tips from High Caliber Records.

Unlocking the Power of Presets: What We Learned from Protohype’s Knights Demo
Veteran mastering engineer Aaron Roman shares 5 tips on mastering electronic music (EDM) for Spotify.

How to Make Custom FM Wavetables with Serum FM Wavetable Studio
Wavetables are an essential tool when sound designing and creating your own sounds. It is the brains and the fundamental

How To Submit Music To Record Labels | Tips, Tricks, & What To Avoid
Learn how to submit music to record labels with these tips from High Caliber Records.
Share This Post With Your Friends

