Although browsing through presets in Vital is a dream, importing and managing those presets can be a little tricky. But fear not, intrepid synthesist!Today we’ll be going over each of the situations you might find yourself in and teach how to handle them like a pro!
Free Vital Preset Packs
Download our free Vital preset packs and get a taste of what our sounds can do for your music.
How To Install Vital Presets – Method One: Importing a Vital Bank
If you have a .vitalbank file, congratulations! You’re in for a whole slew of presets! (and maybe even some wavetables, LFO shapes, and Samples – all of which can be bundled together!)
Here’s how to import a preset bank into Vital:
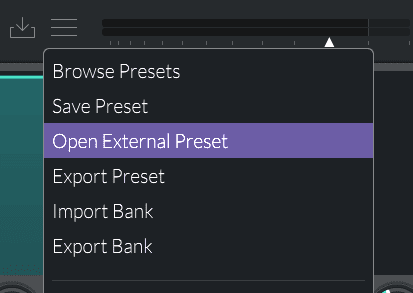
Open the menu, and select “Import Bank”. This will open a file select menu where you can navigate to and select the .vitalbank file.
Navigate to the .vitalbank file you’d like to import.
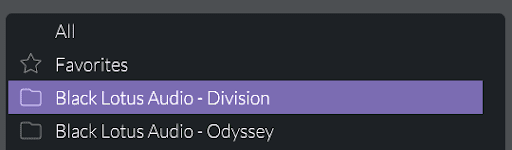
Once you select a file, the presets will be automatically imported to your preset library, and you’ll see them show up as a top level folder in the Vital preset browser.
– Bonus Tip –
This browser folder corresponds to a real folder on your file system, along with your User folder which contains all the presets you make yourself!
Windows – Presets are located in “user/Documents/Vital” Mac – Presets are located in “Library/Audio/Presets/Vital”
How To Install Vital Presets – Method Two: Importing a Single Preset
What do you do if you find yourself in possession of a lone .vital file? (.vital is the extension for a single Vital preset.)
Here’s how you install Vital presets:
Select “Open External Preset” from the main menu. This will open a file selection window where you can navigate to the preset you’d like to open.
Once you choose a preset to open, that preset will be loaded into Vital.
Then, assuming you want to keep the preset around for future use, save the preset using the save button, or the “Save Preset” option in the menu.
Warning! Opening an external preset does not import it to your library automatically! If you don’t save the preset, it will be gone once you exit or delete that instance of Vital.
So be sure to save any external presets you open inside of Vital!
How To Install Vital Presets – Method Three: Importing a Folder or Archive of Single Presets
Unfortunately, sometimes people don’t read the manual (SIKE there is no official manual for Vital as of the time of writing) and share presets manually by just delivering a bunch of files.
If you end up with a folder or zip archive of presets, first please complain to the person who delivered them to you in that format, and secondly, follow this procedure!
Ensure that your folder hierarchy looks like this:
[Bankname] / Presets / [Preset Files]
If the folder of presets isn’t a zip archive, make it one!
On windows, this can be achieved by right-clicking the bankname folder and selecting “Send To -> Compressed (zipped) Folder”
On Mac, this can be achieved by right clicking the bankname folder and selecting “Compress (Zipped Folder)”
Rename the zip file and change the file extension from “.zip” to “.vitalbank” (amazingly this actually works – the internal structure of a .vitalbank is identical to a zip archive!)
Note that windows will warn you that this may make the file unusable – do not heed this warning! It will be ok!
Follow the instructions above for importing a .vitalbank file!
How To Install Vital Presets – Method Four: Managing Vital Presets Manually
If you, like us, are going to make lots of presets, and the idea of organizing them sparks tremendous joy, you may have discovered an unfortunate fact of vital’s preset management workflow.
You can’t create folders within the preset browser!
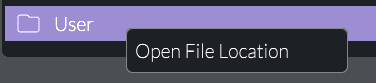
However, you can make folders manually and organize your files yourself using your regular file system. This is made a little easier by the fact that you can right-click on any top-level folder OR preset in Vital’s preset browser and an “Open File Location” option appears!
This will open an explorer/finder window and take you right to the file or folder in question. You can then make folders and move files around however you please.
Adding Custom Folders To Vital’s Preset Browser
If you want to add a custom folder inside of the “Vital” folder, be sure to add a “Presets” folder within it (this is not optional), and then place your .vital presets within that “Presets” folder. Now the custom top-level folder will show up inside of your preset browser!
However, you’ll quickly discover that creating subfolders in the “User” folder to organize your presets doesn’t work very well.
When you load a custom preset, modify it, and want to save it again, it will always save in the User folder, regardless of where you loaded it from. This will leave you with the modified version in the top level, and the old unmodified version tucked away in the subfolder.
Hopefully, a more comprehensive folder system will be added in a future update! Until then, the “Style” tags you can apply to Vital presets make navigating one giant folder of presets relatively painless, as long as you keep up with labeling the presets you make!
To Summarize
Now you know how to install Vital presets and Banks as well as take control of your preset library within Vital!
Just remember:
The main menu within Vital itself allows you to import banks to your preset library, as well as load single presets into Vital which you can then save to your user folder.
On Windows, your preset library is located in the “User/Documents/Vital” folder – feel free to edit and organize your User folder as you wish straight from the file system!
On Mac, your preset library is located in the “Library/Audio/Presets/Vital” folder. Again, feel free to edit and organize this folder as you’d like!
How To Install Vital Presets + Banks – Video Tutorial
Update: If you prefer to learn how to install vital presets by watching a video tutorial, we’ve got you covered.
We made a video version of this blog post that shows you how to install Vital presets, import Vitalbanks, and make Vitalbanks of your own!
Get 800+ Hard-Hitting Dubstep Presets, Samples, & Wavetables.
Our best deal ever. Take your music to the next level with 5 complete premium packs for every style of dubstep.